Showing posts with label clay. Show all posts

Backyard Pond

Penulis : Admin Ashish Chaturevdi on Wednesday, 30 November 2011 | 04:52

Wednesday, 30 November 2011

I thought it would be a cool idea to make a pond in my backyard. Next summer i could plant the lotuses and lily-pads, maybe add some goldfish too.

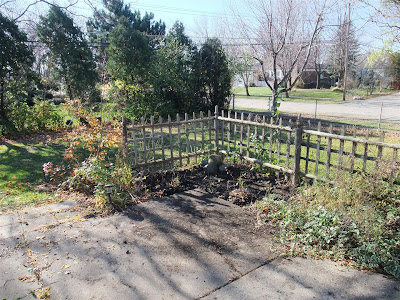
Here's the area i planned on putting the pond. It would be 'L' shaped and fit in between the wood fence and the concrete slab.
design a bakyard pond
I dug down about 4" the approximate area of the pond. I removed the topsoil, leaving the clay.
dig a backyard pond, garden, diy, make
Then in Photoshop I drew in what i thought the pond might look like. I added water, rocks, lotuses and a tiny waterfall in the corner. The waterfall would help aerate the pond and i would also filter the water using a homemade first flush filter.
photoshop to see what a pond in the garden will look like
photoshop landscape, pond, garden, plants, house


comments | | Read More...

Ocarina

Penulis : Admin Ashish Chaturevdi on Monday, 7 November 2011 | 04:12

Monday, 7 November 2011

When i was in Venice i saw a music store that sold ocarinas. It reminded me of my favorite video game The Legend of Zelda. The Legend of Zelda - The Ocarina of Time
I really liked them, they were made of wood, but they were also €30. So i took a few pictures and decided that i'd try and make one when i got home.
professional wood ocarina, venice, italy
When i got home i read that they were either made of wood or clay. Clay was easier and faster so i decided to start with that.

I made the basic shape then cut it in half.
DIY, How to make clay ocarina
I hollowed out the inside then used two different drill bits to make the holes. Although this one looks terrible it sounds really cool.
hardened clay ocarina
For my second try i decided to roll a flat piece of clay then wrap it around a carrot i dug up from the garden. The shape looked a lot better.
how to make a clay ocarina using a carrot
Then i cut it in half and took out the carrot that i had wrapped in seran wrap.
hollow ocarina, carrot, whistle, zelda
Then i made the mouthpiece and let it dry for a day.
ocarina mouth piece
I screwed it up a bit by letting it dry too much. I had to make a new mouthpiece but still had problems in joining it to the already hardened body. But it seems to be alright now. This one has a lower tone to it.
zelda clay ocarina, how to make
zelda whistle, ocarina, flute, legend of zelda
comments | | Read More...

More Drain Pipe

Penulis : Admin Ashish Chaturevdi on Sunday, 11 September 2011 | 16:26

Sunday, 11 September 2011

In mid September i installed yet another drainage pipe in my yard. This time however i used black corrugated plastic pipe instead of PVC. I should have used this stuff from the beginning. It's much easier to use, cheaper, can bend around corners and doesn't need additional fittings.
The new pipe is at the back of my house.
prepare to install drain from roof gutter downspout
I first dug a small trench
. This went a lot faster since i didn't hit tree roots like last time.dig trench near rain barrel, roof drain
Although i did have to dig up some potatoes in the process.
dug up potatoes, garden
I also unearthed my bamboo roots.
bamboo root, rhyzomes, dig, dirt
But i laid the pipe and backfilled the trench with grass clippings
. Then dumped dirt on top. Like before, i used grass clippings to try and allow the water to seep into the ground. If i just backfilled with the clay soil it would never drain.underdrain cap, filter, backyard, gutter
Although i did make sure to pack the pipe near the house with clay. That's the one area that i don't want the water to drain into the soil, because it would then leak into the basement.


This was easy compared to the other times. No 300 pound slabs of concrete to move and no tree roots to chop.
It took a couple hours to dig. final drain backyard, gutter, roof drain pipe
comments | | Read More...

Gutter Drainage Again

Penulis : Admin Ashish Chaturevdi on Monday, 20 June 2011 | 18:29

Monday, 20 June 2011

The first drain pipe in installed by the side of the garage works perfectly. 1st drain pipe The second one i made doesn't. 2nd drain pipe

There's 2 reasons why it doesn't work. First, all the soil in my backyard is clay, which doesn't let the water drain. Second, is that my backyard is basically flat, which also doesn't let the water drain.

So i tried extending the pipe another 10 feet.

assembling PVC pipe for drainage in the backyard, roof drain, gutter
Then instead of just backfilling the trench with clay i added, then compacted, logs and grass clippings.
more PVC pipe needed for roof drain, underdrain, trench, backfill, sandPVC pipe from gutter to backyard, better drainage I then put the dirt back on top of that. I'll probably have to fix this again next year.

comments | | Read More...

Lotus Update

Penulis : Admin Ashish Chaturevdi on Tuesday, 15 March 2011 | 05:39

Tuesday, 15 March 2011

There isn't a lot to do in Michigan from January to March, so this has given me something to keep from going insane. If i lived in Florida it wouldn't be this difficult. Down south the hot and humid air allows the plant to grow almost all year round. The problem is that my house is cold and dry. The first thing i learned is that i can't just put the growing seed in an open bowl of water like people online suggest. Once the shoot reaches the surface it immediately dries out and dies. The air in my house is way too dry and instead of the shoot reaching the surface, unrolling and becoming a lillypad, it reaches the surface, dries up, turns black and dies. So i've had to use Saran wrap to keep the air above the water like a mini-greenhouse. This seems to work. It also holds in heat, which helps too.

But in order for the plant to really get big it needed more space, so i got a big bucket from Home Depot for $5. I actually got 2. The second one is in case the first one leaks.
Then i went to the clearance area of Meijer and bought a water heater, aerator, grow light and a timer.
what you need to grow lotus plant indoors, heater, airator, thermometer
The optimum temperature for the plant to grow is somewhere around 77 degrees. The bowls that i put over the heat vent only got up to around 65. So i tied the water heater to a rock and set it on the mud in the center of the bucket. The grow light and the aerator run through the timer which is set to run between 7am and 9pm. I also added a thin layer of sand over top of the clay to try and help keep the clay particles from floating around in the water.
how to grow a lotus, lilly pad, indoors, bucket, light

Here it is with the Saran wrap covering the top. The moisture does build up on the inside and i have to periodically wipe it down to let as much light in as possible.
saran wrap on bucket to keep the lotus plant humidity high

I thought everything was going great but i killed some of the older plants when i moved them to the big bucket. They started getting white, then brown then they slowly sank and died.

lotus leaves brown, dead, too dry, too cold, not enough sunlight

lotus leaves brown, dead, too dry, too cold, not enough sunlight
I might have added too much fertilizer. I broke in half 2 sticks of slow release fertilizer and stuck it into the mud. But i put fertilizer in the small pots and it didn't kill them. It also might have been a chemical i put in to make the water clearer. Whatever it was the plants weren't doing as well as i had hoped. It might just be that they just need more time to grow. The good thing is that i do have plenty of time. I probably won't be able to move them outside till May or June when the outside air stays above 50.

Once again the process in which i learn something stays the same: I completely screw it up the first time, guess and get it less wrong the second time, understand why i screwed up the third time, then finally get it right the fourth or fifth time. Hopefully by summer i'll have it all figured out.


I also got Asian Lotus seeds when i saw them at a store, 3 pods for $4. The pods were only about half full of seeds so i got around 20 in total. Online it would cost $10 or more to have them shipped.
asian lotus seeds, seed pods, michaels, crafts store
The seeds look a little different from the American Lotus i got in Lake Erie. The Erie ones are much rounder and a lighter brown color. They are the ones on the left.
american lotus versus asian lotus, seeds, shape

We'll see how these new seeds do. I scarified the outside, put them in a jar of warm water and set the jar on the heat vent, just like before.
asian lotus seeds, scour, sand seed shell
So far they seem to be just fine and they started sprouting after only 3 days.

sprouting lotus seed, asian lotus, 3 days

I also noticed that the 2 seeds grow differently. The American lotus seed put most of its energy into growing its first main stem, which is green. The Asian lotus quickly grows 3 smaller stems, which are brown.
how to grow a lotus in a cup, indoors
Hopefully things go better this time.
grow lotus plant inside, in water
The asian lotus also started growing roots sooner.

asian lotus plant grows fast, roots, leaf

Here's one that i grew just in a bowl of water, covered in Saran wrap, over a heat vent. It did the best of any yet. Maybe there's something in the clay or sand that i'm using that is causing the plants to die.many roots from the lotus seed, leaf

Here are the roots from that plant in the water.
lotus seed in water, in a cup, bowl of water, roots, leaf

As of right now i know 20 ways to grow a lotus, then have it slowly die. Hopefully i realize what's going wrong.
comments | | Read More...
 
Design Template by panjz-online | Support by creating website | Powered by Blogger