Showing posts with label exposure. Show all posts

Spinning Wool - Night Photography

Penulis : Admin Ashish Chaturevdi on Wednesday, 16 May 2012 | 10:06

Wednesday, 16 May 2012

When i first saw this type of picture i was sure it was done with some type of firework or sparkler. Then i read the caption and it described it as "spinning wool." So i looked it up online and videos on Youtube and it turns out that it's made by spinning a lit piece of steel wool around in a circle. Here was my first attempts.


I had experimented with taking pictures at night before. About a year ago i did this Snowy Night photography, where i was using a flashlight to write my name.

So the idea is basically the same but the process is a lot more dangerous.

Setup:
  • 0000 fine steel wool
  • Metal harness
  • Wire string
  • Lighter
  • Hooded sweatshirt
  • Bucket of water!!!
Here's what i made as the wire and harness. I just used a coat hanger and some thin gauge wire. As it spins, the steel wool gets pushed to the end of the cage.

I remember reading from a survival book that you can start a fire with a 9 volt battery and steel wool. The charge shorts out on the metal and catches on fire. I remember being amazed that steel wool would burn. So you could use a battery to light it, but a lighter or matches works faster. Here's what the steel wool looks like after it's lit.
http://youtu.be/hBy6H7FXA5w


Now if i just left this there it would gradually turn orange and burn through in about 20 seconds. But by spinning it in a circle, you are adding more air, allowing it to burn faster and the whole process takes just 3 or 4 seconds. The reason these pictures look so cool is that the steel wool actually falls apart as it burns and it looks like a shower of sparks.


Now i didn't have the "bucket of water" when i did this but i definitely will in the future. Luckily it had rained the day before and everything was wet. All of those sparks hitting the ground is a super hot piece of metal and it stays hot for several seconds. It could very easily light something on fire if it were dry. And the hooded sweatshirt is so that if one of the hot sparks lands on your head, which is very likely.

Anyway here are the settings that i had on the camera.

Camera Settings:
  • Canon with CHDK
  • +-25 seconds exposure
  • f/6 aperture
  • ISO 250

I would say that you could do this with any digital point and shoot camera but the exposure time is tricky. My camera maxes out at 15 seconds normally. It would probably work, but you would have to crank up the aperture and ISO and it would most likely turn out grainy. So i turned on the CHDK software on my Canon S95 and set the exposure time to 25 seconds. I think that with the settings listed above it gave me a good balance between not overexposing the sparks but not underexposing the dark background. Also i probably should have turned on the RAW setting but i didn't since this was just a test. If i do this again though i would set it to RAW, which would allow for better Photoshop post editing.

As you can see the sparks fly about 30 feet depending on how fast you spin the steel. I tried different things from spinning vertical, horizontal and all different directions. The key is to get close to the camera, without letting one of the sparks damage it. I stayed on the safe side and stood +-40 feet away.

But i am definitely going to try this again sometime. It was fun and the pictures turned out better than i expected.

comments | | Read More...

Water with a Homemade ND Filter

Penulis : Admin Ashish Chaturevdi on Saturday, 10 March 2012 | 06:39

Saturday, 10 March 2012

While i was out testing my DIY - Camera Polarizing Filter, i also brought my DIY - ND Filter i made from a piece of welding glass. I was really happy with how the pictures came out before when i was at Lake Erie.

Here's a slow-moving river near Flat Rock, Michigan.
ND filter river neutral density water
The ND filter makes a very calm effect. The blurs in the picture are a flock of geese.
ND filter lake neutral density water
I used my new Manfrotto Tripod and it worked great, it was smaller and a lot easier to carry around.
ND filter river neutral density water
The same picture as before, converted to black and white.ND filter river neutral density water dock
comments | | Read More...

CHDK

Penulis : Admin Ashish Chaturevdi on Monday, 12 September 2011 | 04:40

Monday, 12 September 2011

This all started when i searched Google for "how to take pictures of stars." Lots of links came up for this program called CHDK. CHDK Logo, RAWCHDK - Stands for Canon Hacker Development Kit.

The short explanation is that
Canon cameras have the hardware ability to do all of these cool things but the software installed by the factory doesn't allow for it. This is a free program that allows the camera to function at the limits of its abilities. It was created by many different people over the years and it all started by people just wanting to get RAW images from their camera. It has been evolving and added onto ever since.

If you are interested in how to install it onto your camera go here:
How to Install CHDK. It seems a bit complicated at first but it's not too bad. Just "prep" your SD card, add the program and any script files you'd like and you're done.
I installed it onto my old Canon PowerShot SD770 IS. This is a great camera, with a battery that lasts a long time.
Canon SD770 IS, Power Shot
Here's the 5 main things that i was interested in doing:

  • Intervalometer
  • HDR pictures
  • Very long shutter speeds
  • Very short shutter speeds
  • Motion detection
Screenshot at start-upHow to use CHDK with Canon Camera, start up screen
Main menu
CHDK Main Menu, canon, screen view


1st - Intervalometer

Intervalometer basically means
"takes many pictures in a row with a timed delay." I used the script file called Ultra Intervalometer.

Once your script file is loaded, you adjust the settings at the bottom. You can see that this is set up to take a photo every 10 seconds.
Here's what the menu looks like.
CHDK intervalometer, screen shot, view, settings
Here's what the screen looks like while the file is running. At the bottom left corner of the screen you can see it counting down before it takes the next picture.
Ultra Intervalometer, CHDK, screen, Canon, install, script
I did this from the walkway near 12 mile over I-75.


I set the camera up during my car ride from work. This was 150 pictures, taken every 10 seconds. Then using a program called PhotoLapse 3, a video is created by stitching all of the pictures together.


I did this by setting my camera and tripod on the roof of the garage and operated the camera through my upstairs window. The bad thing is that the exposures didn't adjust as it got darker, which is why it fades to black at the end. Next time i'll try and fix it so that it starts taking pictures of the stars at night.

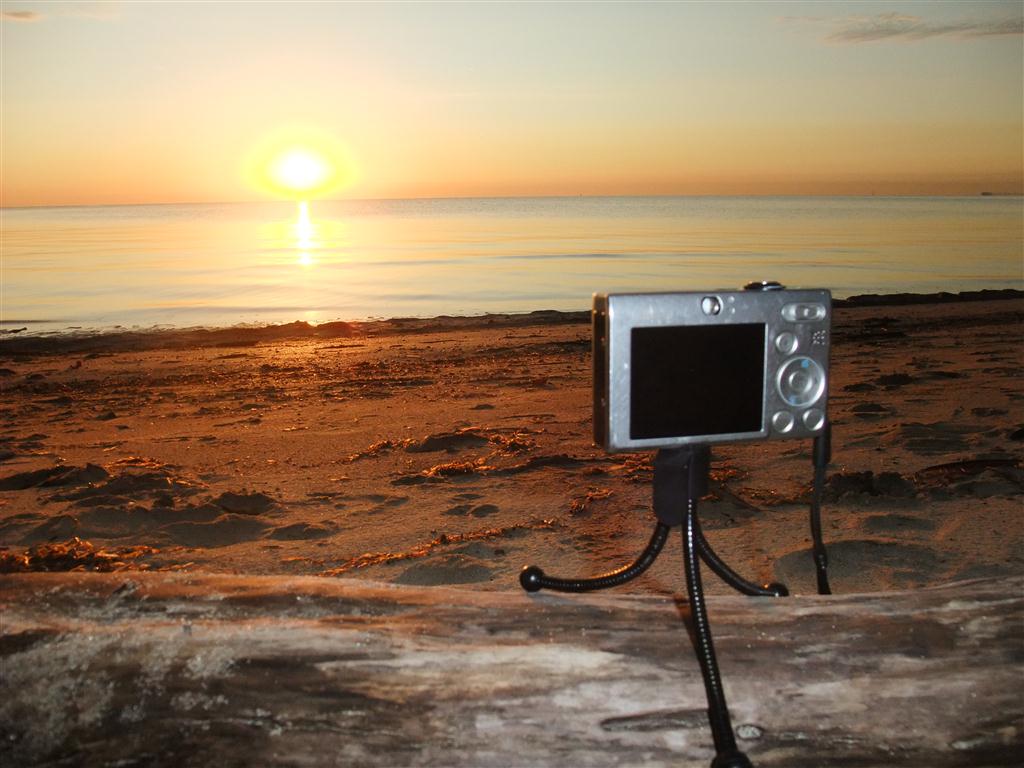
This is the camera set up on the beach at Lake Erie for time lapse photos.
Canon camera, CHDK, tripod, time lapse sunset

It has millions of possibilities. In the future i plan to attach the camera to balloons or a kite and have it take pictures every couple of seconds while it flies over my house.


2nd - HDR Photos


To create an HDR image you take several pictures of different exposures and combine them to create one great picture
. It's a little difficult to explain and i think it's very difficult to do right. But the goal is to create an image the way our human eye sees things. Our eyes can see detail in shadows even when looking into a sunset, HDR photos try to do the same thing by taking the best parts of multiple images.

Bracketing menu.
CHDK bracketing menu, screen view
You can see that in one picture the shadow area might look great, then in another picture the sunny area might give the best detail. By creating an HDR photo it combines all of the best parts into one great photo. Here's 5 photos i took, without moving the camera. Using CHDK i just hold down the shutter button and it automatically takes the pictures at different exposures.photo bracketing example, thirds, exposure
After you have these photos you can use several programs to combine them.
I tried using several different programs. Picturenaut worked ok, but i think Photomatix is the best. They both have free versions.
Once the images are combined, then you screw around with Tone Mapping, save the image, then adjust it further in Photoshop. Here's the final result.
HDR, combine photos, exposure
The sunflower isn't a great example. The whole point is to take HDR photos in complex light and dark settings. This one i took on the beach of Lake Erie is a little better.
HDR, combine photos, exposure, CHDK
I'm still working on creating just one HDR image that i like. I'm slowly getting better.


3rd - Long Shutter Speed

This is something i have done before, but i was limited to the settings in the camera. This is the heart of CHDK, it enables the camera to operate at its hardware limits.

When i took pictures with my cameras before, the maximum i could keep the lens open was 8 seconds.

Flashlight in the backyard

Dry ice

And for what i was doing, 8 seconds was alright. But with CHDK it allows the camera lens to stay open for much longer, over 1 minute.


I took this picture outside of work one cloudless morning before dawn. I had the camera set on my mini tripod and opened the lens for 25 seconds.
Long Exposure, CHDK, stars and moon
Now to get the best result, this should really be done with a DSLR camera with a big lens to let tons of light in. Here's a professional example. This took several hours to take.


This is what i was trying to create.
Star Trails, photoshopThe cool thing is this shows why you should only follow the North Star, everything else moves in the sky.

The photo i created doesn't look that good. The problem was that my camera would not record the image fast enough. I left the lens open for 50 seconds, but after the shot was taken it took 40 seconds to record and take the next shot. That's why it looks like many dots instead of smooth lines.
How to create star trails, long exposures, CHDK, canon camera
I later bought a faster SD card (class 6) that records at 20mb/s but it was just as slow. That means that the problem is in the camera and there's really nothing i can do about it.

I've found that the best program to combine all of the photos into one is coincidentally called StarTrails. It's really fast, really simple and it's what i used to create the image above.

Here's the video created from those same pictures.


Here's other photos of the highway using long shutter speeds.

how to take car streaks, tail lights, camera photo
highway car tail lights, light streaks, long exposure at night
early morning highway car tail lights


4th - Short Shutter Speed


This is the menu that i use the most. Here you can adjust the shutter speed, ND filter (a sort of digital aperture) and ISO value.
CHDK menu shutter speed adjust
I tried shutter exposures between 1/1000 and 1/20,000. The camera was set up in front of a glass with water dripping down. Both the camera and glass were in the kitchen sink.
I took about 100 pictures in total, using the intervalometer to automatically take one photo right after another. I was was holding two flashlights on either side of the glass and also had the flash turned on. Otherwise the pictures came out way too dark.
F-Stop = f/8
ISO = 80
Exposure = 1/1000

I probably should have set the ISO a lot higher. I think that would have made everything end up in better focus.
water droplets, CHDK, exposure, fast water droplets, CHDK, short exposure
This one was at 1/1500 of a second.
How to take water droplet photos with CHDK
Here's what the process looked like. Notice how it's daylight outside. That wasn't enough, i still needed the flash, the light on, my big 3 million candle power flashlight and another LED flashlight held real close.
Water Droplet photo setup, light, tripod
The result was this. Now notice how dark it looks outside, when it was really sunny. That short of a shutter speed needs tons of light.

Water Droplet photo setup, light, tripod, faucet
Here's the tap turned on a bit faster.
frozen in time water droplets, super fast exposure
This one didn't turn out as well as i hoped. I tried to get the starting of a lighter. Again with the fast shutter speed i needed more light.
cigarette lighter, flame


5th - Motion Detection

Motion detection is a script file and it can be used in many different ways, from
taking photos of lightning or used as a trail camera.

Here's what it looks like when the motion detection script is running. It's a little hard to see but the whole screen has green boxes covering it, and instead of face detection it is now motion detection. Once you input the sensitivity, and movement will cause the camera to take a picture.
CHDK motion detection, screen, script
The cool thing about the motion detection is that you can put the camera on a tripod, aim it at an approaching storm and when lightning strikes it will take a picture, capturing the lightning bolt. It might be a while before i get a picture of that. It's sort of a right place at the right time kind of thing.
Anyway it's been great to experiment with and i've enjoyed having the ability to do all this stuff without buying a really expensive camera. It's created tons of new possibilities.

comments | | Read More...

Snowy Night

Penulis : Admin Ashish Chaturevdi on Wednesday, 12 January 2011 | 04:42

Wednesday, 12 January 2011

Last week i was reading online about how to take better pictures at night. All the pictures i used to take were real grainy or blurry. So after the big snow storm i shoveled the driveway at 10pm then went in the back yard and started experimenting with my camera.

The first few pictures came out really poorly but slowly got better and better. These were taken with the lens being open for 4 to 8 seconds. The camera had to be set on a tripod to making sure it didn't move at all. I did leave the porch light on for a couple to create some cool shadows.

long exposure photography, night pictures, snow

long exposure photography, night pictures, snow
night picture, photo, image, in the snow
snow shadow at night
how to take photos at night in the snow
taking better photos at night, snow, shadow
night skyline, winter, michigan
With the lens open for the maximum that my camera would allow, 8 seconds, i tried writing my name with a flashlight and shining the light on me to make a ghosting effect.

how to write your name at night with a flashlight
photography, write your name with sparklers, at night, long exposure
create ghost faces in night photography, flashlight
picture of ghost at night
multiple ghost images, person, night photography, exposureweird ghost effect, night photography

comments | | Read More...
 
Design Template by panjz-online | Support by creating website | Powered by Blogger